Webpack, Vite, Babel, ESLint and More — The Tools Every JavaScript Developer Should Understand
Every modern JavaScript project has a build pipeline running behind the scenes. You write TypeScript, JSX and SCSS but the browser understands none of it. This article breaks down how module bundlers like Webpack and Vite take your source code and turn it into something browsers can actually run.
Module Bundlers
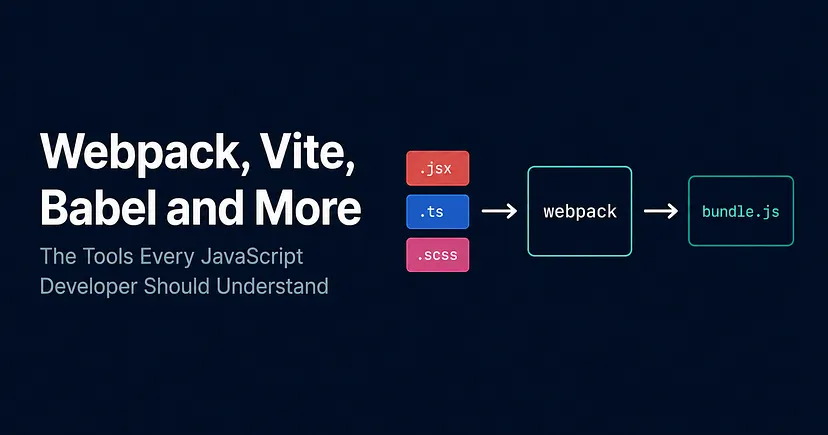
A module bundler takes all your JavaScript files and combines them into one single file (the bundle) to be shipped to the browser. One request, one file, everything in the right order.
Webpack can also handle SCSS, images, fonts, JSON and running each file type through the right transformer before bundling everything together.
The Problem Module Bundlers Solve
As JavaScript applications grew in complexity, the way the web handled JavaScript simply didn't scale and there were several problems happening at the same time.
The browser had no native module system, which meant that it couldn't just import code from another file. Therefore, developers either loaded multiple files via separate <script> tags, each one making its own network request, or they dumped everything into one big file.
Multiple script tags were slow and order-dependent. If file B depended on something in file A and A hadn't loaded yet, everything broke. One big file solved the request problem but created a maintenance nightmare.
Furthermore, that meant that everything lived in the global scope. Without a module system, every variable and function you declared was global which quickly became a problem as things would clash and overwrite each other with no warning across multiple files.
You couldn't also use npm packages in the browser. Node.js had CommonJS require() for importing modules, but the browser had nothing equivalent. If you wanted to use a library, you'd typically download it manually or load it from a CDN and hope it didn't conflict with anything else you had in your code.
There was no transformation pipeline. If you wanted to write SCSS, TypeScript, or JSX, developers had to manually compile SCSS to CSS, compile TypeScript to JavaScript, compile JSX to JavaScript and manage all of that before anything could run in the browser.
Module bundlers solved all of this in one go. You write your code split across as many files as you want, using proper imports and exports. The bundler analyses those files, builds a map of how they all connect also known as the dependency graph, runs each file type through the right transformer, and outputs one clean optimised bundle the browser can understand.
There are plenty of module bundlers out there, such as Webpack, Vite, Parcel, Rollup, esbuild to name a few, however we’ll focus mainly on Webpack here since it’s still the most widely used in production, but we’ll shortly touch on Vite too.
How Webpack Works
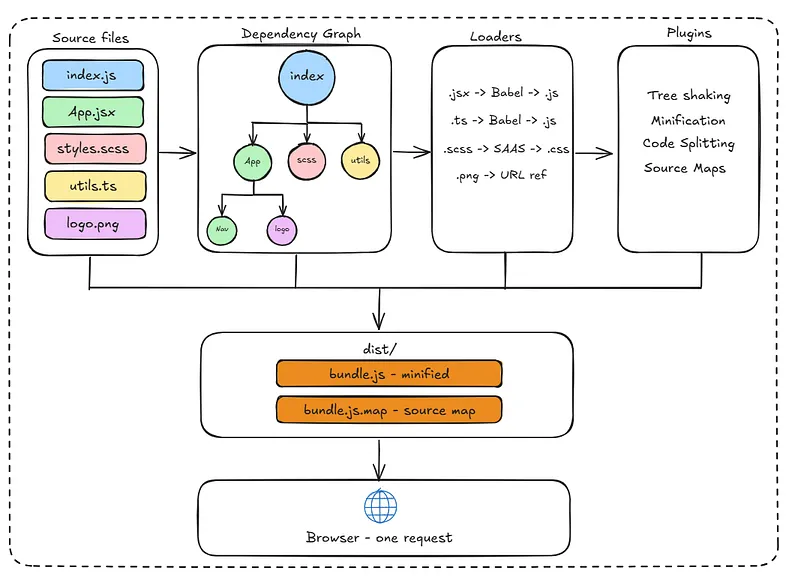
Webpack starts from an entry point, usually your main index.js and recursively follows every import it finds until it has mapped out every file your application depends on. That map is the dependency graph.
Each file then gets passed through the relevant loaders, transforming .jsx to JavaScript, .scss to CSS, .ts to JavaScript and so on. Once every file has been transformed, the plugins run on the full bundle, handling tree shaking, minification, code splitting and source maps. The final output lands in a dist folder, shipped to the browser as a single request.
Dependency Graph
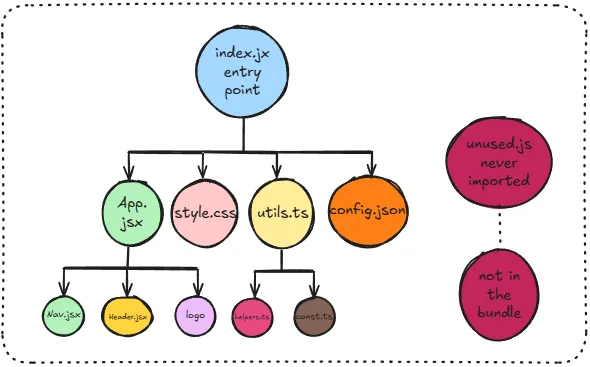
As we’ve mentioned above, a Dependency Graph is an internal graph structure Webpack builds from your import and export statements. Starting from the entry point, it recursively maps out every file your application depends on, directly or indirectly.
Anything not in that graph doesn’t get included in the bundle. So if you installed a library but never imported it anywhere, Webpack won’t include it. This is one of the benefits of Webpack, as it keeps the bundle lean and only ships what your application actually uses.
The graph determines two things — what gets included in the bundle, and in what order. If module A depends on module B, webpack knows B needs to be processed first. It uses this ordering to ensure nothing breaks when the bundle runs in the browser.
Loaders
Out of the box, Webpack only understands JavaScript and JSON. Everything else, such as SCSS, TypeScript, JSX, images needs to be transformed first, by something called loaders.
Think of a loader as just a transformer. You configure Webpack to say “whenever you encounter this file type, run it through this tool first.” Webpack runs the file through the loader, gets back something it understands, and adds it to the dependency graph.
For example:
- .scss files → run through the SASS loader, outputs plain CSS
- .jsx / .ts files → run through Babel loader, outputs plain JavaScript
- .png files → run through file loader, outputs a URL reference
Loaders only transform a single file at a time. If you need to do something more complex like bundle optimisation or asset management, that’s where plugins come in. Plugins have access to the entire compilation lifecycle, not just individual files.

Babel
Babel is a code transpiler and its job is to take JavaScript the browser doesn’t understand yet and convert it into JavaScript that it does. It sits between your source code and the browser, acting as a translator.
Two main things it handles:
JSX — browsers have no idea what <div> means inside a JavaScript file. That’s React’s JSX syntax, and it doesn’t exist in the JavaScript specification.
In the old JSX transform, Babel converted JSX into React.createElement('div', ...) calls. Since React 17, the new transform instead imports functions from react/jsx-runtime automatically, meaning you no longer need to import React at the top of every file just to use JSX.
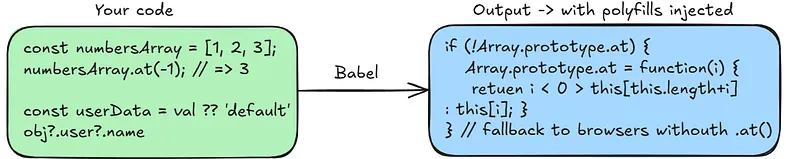
Therefore, you write the latest JavaScript syntax and Babel rewrites it into something every browser can understand. For example, if you’re using optional chaining ?. or nullish coalescing ?? and some of your users are on older browsers that don't support them, Babel rewrites those into equivalent code that does work. That's the syntax transform side, Babel rewrites syntax the browser doesn't understand. Polyfills are different: they provide fallback implementations for missing runtime features like Promise or Array.from. Babel handles both, but they're separate concerns.
Babel is just one of the tools Webpack uses as a loader. They work together but are completely separate tools, you can use Babel without Webpack and Webpack without Babel.
Tree Shaking
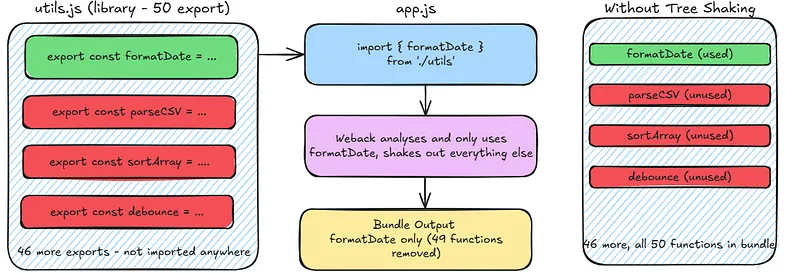
As mentioned previously, even within files that are in the Dependency Graph, not everything you import necessarily gets used. Tree shaking is Webpack’s way of removing that dead code before it ends up in the bundle.
For example, if you import one utility function from a library that exports 50, Webpack can analyse exactly which exports are actually used and shake out the other 49. The result is a significantly smaller bundle so you’re only shipping code that actually runs.
This only works with ES module import statements. With CommonJS require(), Webpack can’t statically analyse what’s being used because require() can be dynamic and the module name could be a variable. ES module imports are always static, which means Webpack can analyse them at build time and make safe decisions about what to remove.
Source Maps
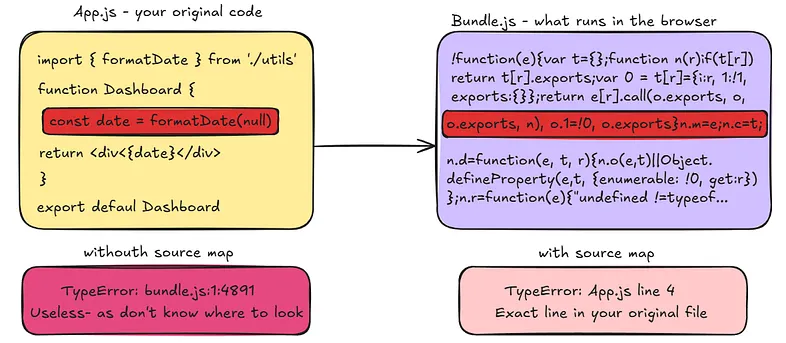
When Webpack bundles your code, what runs in the browser looks nothing like what you wrote. Variable names get shortened, whitespace is stripped, multiple files are merged into one.
Source maps solve this by providing a mapping between the bundled code running in the browser and your original source files. When something breaks and your browser throws an error, instead of pointing you to line 1 of a minified bundle, DevTools uses the source map to show you the exact line in your original file where the problem is. Essential for debugging in production.
Polyfills
A polyfill is a piece of code that replaces a missing language feature in browsers that don’t support it yet. If you use a modern JavaScript method and a user is on an older browser that doesn’t support it, a polyfill provides a fallback implementation so it still works.
Babel handles polyfilling through @babel/preset-env. You tell it which browsers to support, and it figures out which syntax transforms are needed automatically. For runtime polyfills like Promise or Array.from, you also need to configure useBuiltIns and install core-js — Babel uses that to inject only the polyfills your target browsers are actually missing.
Vite
Vite solves the same problem as Webpack but takes a fundamentally different approach, especially during development.
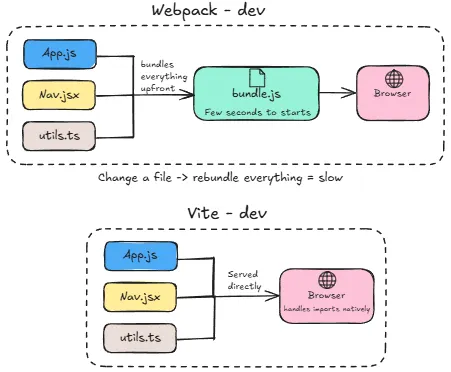
Webpack bundles your entire application upfront before you can start working. On a large project this can take a few seconds to start, and every time you change a file it has to rebundle. You can already see that as your application grows, this gets slower and slower.
Vite skips bundling entirely during development and it leverages the browser’s native ES module support. This is done by serving your files directly to the browser as individual modules and lets the browser handle the imports itself. When you change a file, only that file needs to be updated, not the whole bundle. The result is near-instant startup and updates that reflect in the browser in milliseconds regardless of how large your application is.
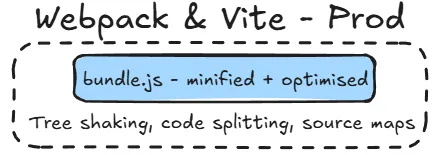
For production, Vite does bundle everything properly using Rollup under the hood, because sending hundreds of individual module requests to the browser in production would be slow. So the end result is the same — the developer experience getting there is dramatically faster.
Configuration is also significantly simpler than Webpack out of the box. Webpack is notoriously complex to configure correctly, whereas Vite works with sensible defaults for most modern projects.
None of these tools exist to make your life harder. They each solve one specific problem, and together they form a pipeline that just quietly keeps your codebase in good shape.
PS: This is based on my own research and understanding of how Modern Frontend Tools work. I’d always recommend double checking other resources if you want to go deeper. I wrote this mostly for myself, but if it helps someone else along the way, that’s a win. Thanks for reading.